
Google Maps JavaScript API is a powerful tool that allows you to customize maps with your own content and imagery for display on web pages and mobile devices. Today we will be looking into the polygon drawing and editing functionality using this SDK for a React Native app.
First, to get started, you need to install the Google Maps JavaScript API by following the official documentation provided by Google. The link to the documentation is here: https://developers.google.com/maps/documentation/javascript/overview.
For development, we will be using React Native Cli with Android Studio. Now that we have set up the project, we need to import the MapView component from the react-native-maps library. We also need to import Marker, Polyline, and Polygon components from the same library to use them in the code.
import MapView, { PROVIDER_GOOGLE, Marker, Polyline, Polygon } from 'react-native-maps';<MapView
provider={PROVIDER_GOOGLE}
ref={map => (this._map = map)}
style={styles.map}
showsUserLocation={true}
showsCompass={true}
showsMyLocationButton={true}
zoomControlEnabled={true}
onPress={this.handleOnPress}
mapType={'hybrid'}
region={{
latitude: this.state.latitude,
longitude: this.state.longitude,
latitudeDelta: this.state.latitudeDelta,
longitudeDelta: this.state.longitudeDelta,
}}
/>Here, the onPress function is used to add a marker to the map. Every time the map is pressed, a Marker will be added to the coordinates using the event. Now let’s create an array to store the markers and an array to store the polygon.
state = { markerArray: [], polygonCoords: [] }We need to add the marker array to the map:
{// Markers Drawing
  this.state.markerArray?.map((markerCoords, index) =>
    return (
      <Marker
        coordinate={markerCoords}
        key={index}
        tappable={false}>
        <View>
          <StyledMarker color="#fff" />
        </View>
      </Marker>
    );
  }
Here, a custom marker icon has been created that is styled to make it look better:
const StyledMarker = ({ size = 16, color = '#000' }) => {
  const outerRadius = size / 2;
  const innerRadius = size / 4;
  return (
    <Svg width={size} height={size}>
      <Circle cx={outerRadius} cy={outerRadius} r={outerRadius} fill={color} />
      <Circle cx={outerRadius} cy={outerRadius} r={innerRadius} fill="#000" />
    </Svg>
  );
};
This is what it looks like:
Now, let’s add lines joining the points and a dotted line to join the start and end point. To do this we need to add an event to the first marker.
Lets update our code for markers like this:
{
 // Markers Drawing
 this.state.markerArray?.map((markerCoords, index) => {
 if (index > 1) {
   return (
     <Marker
         coordinate={markerCoords}
         key={index}
         tappable={false}>
         <View>
         <StyledMarker color="#fff" />
         </View>
     </Marker>
     );
   } else {
   return (
   <Marker
       coordinate={markerCoords}
       key={index}
       tappable={false}
       onPress={this.completePolyOnPress}>
       <View>
         <StyledMarker color="#fff" />
       </View>
   </Marker>
   );
}})}
Here you can see we are adding an event to the first marker to complete Polygon on press.
We empty the markers and save it to a Polygon Coordinates array.
completePolyOnPress = () => {
this.setState({polygonCoords: this.state.markerArray});
this.setState({markerArray: []});
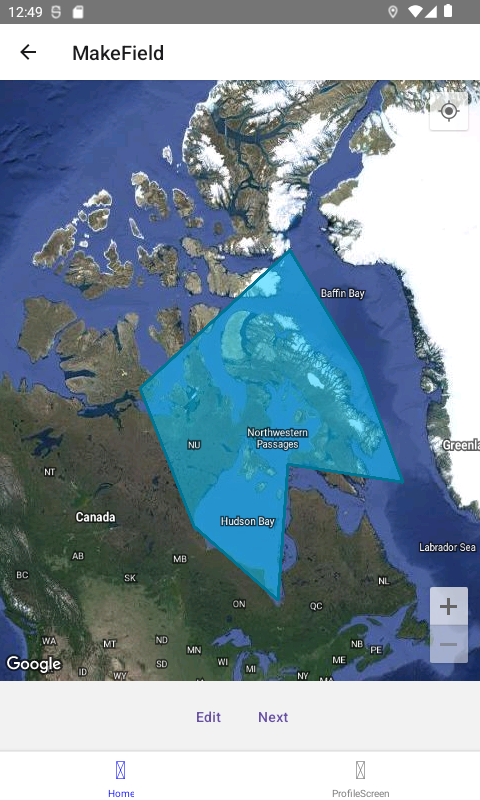
}Lets add a polygon component to the map.
{
  // Drawn Polygon
  this.state.polygonCoords.length > 2 ? (
    <Polygon
      coordinates={this.state.polygonCoords}
      strokeWidth={3}
      strokeColor={'#007493'}
      fillColor={'rgba(0, 201, 255, 0.5)'}
    />
  ) : (
    <></>
  )
}
Finally, when the first point is clicked, we will close and finish the polygon
As a GIS Engineer and Web Developer, I have been using the Google Maps JavaScript API for a variety of applications. In this tutorial, we explored how to draw and edit polygons on a map using the API in a React Native app.
If you found this article helpful, please give it a follow to stay up to date with the latest tutorials and tips on developing your Geospatial web and mobile applications. I value your feedback and would love to hear your thoughts and comments on this article.
Let’s continue to learn and grow together as we leverage the power of GIS and web development to build innovative and impactful applications. Thank you for taking the time to read this article, and I look forward to connecting with you in the future.